Monday, February 27, 2012

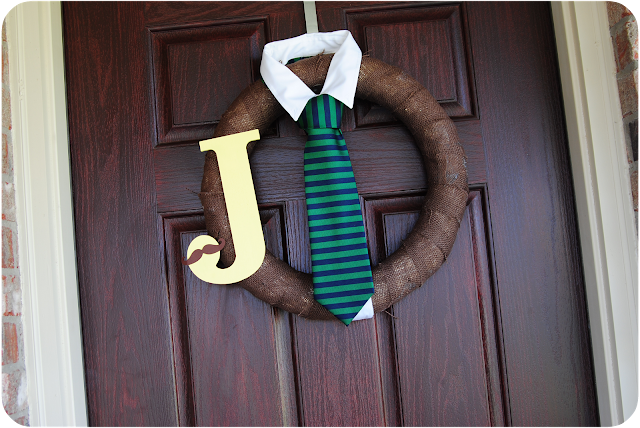
Little Man Wreath


Here's the wreath the I made for the gray and yellow Little Man baby shower. I got a few wreath hangers after Christmas for .20 each. They're great to have around for everyday, holidays, and parties. Its so much fun to be greeted with the theme when you first walk up to the house. This wreath is made of straw, which turned out to be about 1/2 the price of buying a foam wreath base. Plus straw is cute and crafty when showing underneath... white foam? not so much. I wrapped the wreath with navy yarn, and attached every few inches in the back with hot glue. When I cut just the collar and button area from a gray shirt, I left about 1 inch fabric on either side of the buttons, folded it under the buttons and hot glued it down. Otherwise I would have ended up with jagged scissor lines/ fraying showing. The bow tie is made of yellow felt and hot glued onto the shirt. Pretty simple.

Here's where I got the idea:

from home.made.


from BlogHer

Friday, February 24, 2012

Princess Nail Polish tutorial

My nanny child Rosalie is turning 3 very soon. Since the theme of the party is Princess, I've been picking up anything I can find with a princess on it. I found Disney Princess nail polish online for $5.00 plus shipping, but it turned out to be only $1.00 a nail polish if I put it together myself. Plus I'm kidding myself if I wasn't dying for an excuse to craft. This could work with any theme you're looking for. Imagine: Dora, Care Bears, Strawberry Shortcake, Barbies, Ladybug... If there's a theme there can be a nail polish, lip gloss, bracelet, ring, candy, eraser, pencil,... to match it. All you need is the right packaging and the color of the object to match. If you can't find a sticker to go on your package, you could print out a picture.
Materials: stickers, nail polish color that will match the sticker you plan to pair it with, card stock to make the label, small baggies (found in the cake decorating section of the craft store), stapler, optional: something to decorate the label with (glitter, gems, ribbon, stickers etc...).
Assemble your package. I trimmed the baggie, folded the cardstock over the baggie, and stapled it shut. Notice the staple showing. When you decorate your package you can cover the staple.
Voila! Princess nail polish.


Isn't being a girl fun?! Here are some happy-go-girly nail polish ideas:


Cupcake-cute-nailpolish-nails-polish-favim.com-122814_large
From EmeraldSparkled

From Miyoko77us

Did girly nails for my friend. She chose the colour combo and I’m loving it! :3
From Chibinails

Rabbits
From iamCHUCKyouarePIE
Owl nail art | I love owls, they’re really cute. I painted pink owls and there’s a feather on my nail but the photo is not so clear… I hope you like my pink owls! xoxo
From Oh My Nails


Update: This post is about a year old, made for a blog I no longer update. Rosalie loved the nailpolish and still refers to each one as "my cinderella nail polish" or "my belle nailpolish". So cute!

Monday, February 20, 2012

DIY Cupcake Stand


I adore these cheap easy cupcake stands, and will probably be making them for every event for awhile. Here are the ones I put together for the yellow and gray Little Man baby shower. Depending on which stand you look at, the bottom piece is a candle stick, wine glass, or vase. The top piece is a plate. I can get each piece for $.50 at goodwill, a can of spray paint for $5.00, and the epoxy adhesive for $3.00 at Michael's. The wine glass bases are the most sturdy, but I love the delicate look of thin candle sticks. When I get a specific color spray paint for an event, I also use the spray paint for favors, decorations or tissue paper pom poms. White tissue paper is much cheaper than colored, so make your tissue paper pom poms out of white, fluff them out and spray the desired color.

Here are some great cake stand tutorials:

from EatDrinkPretty


from Life with Little Ones

from The Sassy Pepper

from Goldiloks

CAKE STAND DIY
from Artful Aussie


from Bird's Party


from Modern Momernts


Monday, February 13, 2012

Romance While Pregnant

It's getting really close to the arrival of baby Fisher. My hubby and I are incredibly excited for a our little family to grow, but I don't want us to miss out on the fun of these last few weeks alone together. The closer we get to the due date, the more our lives seem to revolve around the baby. We want to be just as purposeful in our romance with each other as we are in our future parenting. Setting aside time that is just for the 2 of us, without any "baby talk" has been wonderful. Being purposeful in being romantic together is always important, but trying to keep up with it during pregnancy has shown me 2 additional obstacles.
1. My body is an uncomfortable, ever-changing baby factory. Physical love can be more difficult. Romance through wine or sushi is out. Some days my moods or fatigue can make it hard for us to get out to do anything at all. Its easy for things to get centered around me and the baby, but important to keep reminding myself that hubby has needs too. I need to help him get recharged so he can keep nurturing me.

2. Our money-munching addition will be here soon. :) This means we need to get creative about dates-without-dollars. Here are some of my favorites:
Have an indoor picnic
Or an outdoor one


Take a walk with the pets out in nature or through the city. You could stop for
Starbucks, or make a thermos of hot cocoa before you leave. Baby-talk is off
limits, and end the day with some good physical love time.
Make a date all about him for once. Participate in his favorite activity and make his favorite dinner/ dessert.


Here are some sites with good lists of cheap date ideas:
Post image for Cheap Date Ideas for RMs
From The RMTC
From The Gentleman's Corner

From Six Sisters' Stuff

Frugal Date Ideas
From Bible Money Matters

Friday, February 10, 2012

DIY Children's Superhero Cape

In case no one let you in on the secret, capes are awesome!! Here are some of my favorites:
By I Never Grew Up

By Onto Baby
By Tortoise and the Hare


This cape was made Christmas 2010 for my nephew.
     I created the pattern by tracing a finished superhero cape onto newspaper. The original cape is from chasing fireflies. Their cape's come in one size, priced at $48.00, and are very well made. The cape I ended up creating fit my 2 1/2 year old nephew (lets call him Clark Kent) pretty well, and my afternoon nanny kids, age 7 and 9, still wear theirs. On the right side of the neck hole, a 2inch by 1inch strip continues. With Velcro, this becomes the way the cape attaches. I cut a C (first letter of Clark's name) on paper on the Cricut. I traced everything in the color I would want it to be, but cut the fabric out about 1-2inches from the traced line. Everything was traced on the non-shiny side of the fabric so no-pencil lines would show up. The cape was sewn (red outside, blue liner) mostly inside out, then flipped to expose the shiny side. I stitched the C and the yellow diamond shape by hand. I also attached them by hand. I know you could do this on the sewing machine, but I haven't figured that out yet. I attached the Velcro and voila! The best part was seeing my little Clark wear his new cape everywhere. Every little boy likes to be a superhero!

Monday, February 6, 2012

DIY Doorway Puppet Theater


Puppets are such an amazing tool for imagination. They talk to each other, they talk to the audience or they make up their own stories. I made this puppet theater for the girls I nannied, ages 2 and 3. I started with a curtain from Ikea. The curtain came in a set of 2. I plan to use the second curtain for another puppet theater later on. I bought a 1/2 yard of plain blue fabric from hobby lobby to create the little curtains. The 1/2 yard was plenty to make mini curtains for 2 puppet theaters. I used red ribbon I already had on the top and sides of the mini curtains. The 2 bows used as curtain tie backs are secured onto the light blue so they will stay in place when you untie them. The girls open the mini curtains when the show is starting and close them when it's over. Since storytelling skills are still at their beginning stage with the girls, their favorite parts are to open and close the curtains, hear the applause, and take a bow. There are lots of neat tutorials for making your own puppets, but I ended up ordering a pack of animal puppets on amazon instead. The puppets aren't amazing quality, but they were great for taking a toddler beating and the best price when it came to the time I was saving. Now that I know the girls like  the puppet show concept, I'll invest more time into hand making some quality puppets. I used a tension curtain rod from target to keep the puppet theater up. I love this option because it doesn't damage the walls, you can use it in any doorway, and the theater can be set at different heights for a tall or tiny puppet enthusiast. I've seen other puppet theaters where they use nails on either side of the doorway to hang the theater. I like this option when playing with toddlers because you never know when an excited puppet will yank the show down on top of them all. The idea of the tension rod falling on their heads scares me, but I didn't want to give the gift without a proper way to hang it. Thankfully the rod is lightweight, and the girls understand what will happen if they pull hard on the curtain. It's just those mischievious puppets we'll need to watch out for.


Fun inspiration and tutorials:

puppet theater
From Country Living


From Love & Sugar Kisses

047
From The Crafty Cupboard

Adorable Puppet Tutorials:

Photobucket
From The Idea Room

Blog - puppets
From FiskarsCrafts


From Soto Softies


cute bunny egg warmer / hand puppet : Etsy Easter bunny egg warmer hand puppets puppets
From Redmush