Tuesday, April 8, 2014

Tot Trays- Playdough

Time for an updated look for the Tot tray. We've been using an old stained baking sheet (see Tot Tray 7), but this week I decided to spray paint it a clean blue. Color makes my heart happy.

Tot Tray 7-
Use shapes from a shape sorting toy to make impressions in play-dough. In the spirit of our activities being tot-led, this activity changed to being all about stacking the shapes as we name them... Play-dough sad and forgotten.


Tot Tray 9-
So, I know I'm going out of order here, but as fun as playdough is, I don't think three days in a row of the same "play-medium" is very exciting or brain-stimulating. For the blog, I'm grouping them together, but the tot tray numbers are in the actual order I used them in.

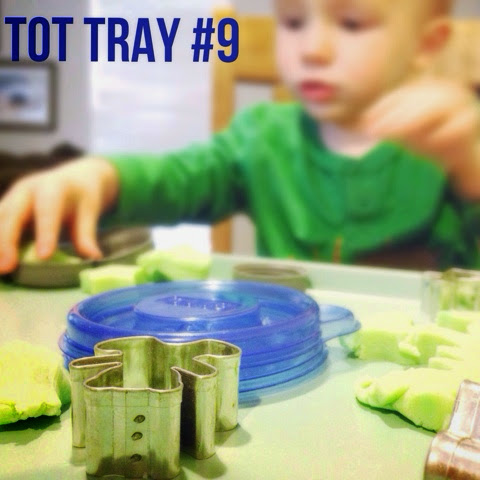
Use mini cookie cutters with scented play-dough. We added spearmint extract to homemade play-dough, but I don't see why you can't add scents to any play-dough. I think it's important exploring all 5 senses, which is why I made the scented dough, but I'm pretty sure it's contributing to Fisher's love of tasting everything we put on the tot tray. Seriously we have not had a single tray where he keeps the stuff out of his mouth. Mabey next week we'll paint with Tabasco. Or to make something good out of this, we should have a veggie themed tray. Fill that tray full of junk that's good for him and hope he doesn't realize that playtime just blended into lunchtime.


Tot Tray 12-
Hide small objects in playdough for your tot to discover and uncover. I hid around 20 giraffe sequins, but I've seen people use googley eyes and alphabet magnets to embed in playdough. Up until this point, Fisher has been experimenting with playdough only by pushing things into it. This activity naturally encouraged him to pull the playdough apart because that was the only way he'd find the other giraffes. 

Tuesday, April 1, 2014

The Semi-Homemade Toddler Art Set Gift

My kit includes:
Handmade Toddler apron
My First Crayola markers
Finger paints
Paper pad
Handmade toddler crayons in a small handmade drawstring bag
Large handmade drawstring bag to hold it all


Saturday, March 15, 2014

Tot Trays 4, 5, &6

Tot trays have become a regular activity around here. I love the one-on-one time, the tv-free fun, and fine motor practice. There's no real rules, just exploring the things we have around the house (look at that it's free) in new ways (woo-who! brain stimulation!).

Tot Tray 4-
Sort colored pasta into recycled yogurt cups. We'll need to try this again in a bit. Fisher enjoyed pouring the pasta in and out of the cups and naming the colors, but not so much about the sorting. Laughing at mommy sorting the pasta was pretty exciting.


Tot Tray 5-
Set out strips of colored paper for your tot to shred into confetti. We used purple, green, and yellow to celebrate Mardi Gras. Fisher's love for all things inedible does not end with paper! When we had exhausted the joy out of tearing paper, we threw the confetti up in the air and shouted "hooray!" Made my day to hear such exuberant "hoo-way!"s coming from my little boy.


Tot Tray 6-
Pinch a cotton ball with a clothes pin and use it as a paint brush. We used scented paint that we found on clearance at Target. This provided added sensory fun. Fisher's need to make a great mess meant that we moved our painting fun to the bathtub. Just strip 'em down, let him go to town with the paint, and hose him down when you're done. Our paint said washable, but I had to scrub the walls a bit to get the staining off.

Adventures in Tot Trays

I'm finding myself with less and less time for photo editing, computer time, and blogging. It's time to switch gears. If any things going to get posted, it'll have to come directly off the phone :)

Lately we've been having fun learning time with Tot Trays. They are Montessori inspired activities concentrating on self-led exploration and building fine motor skills. Here are a few of our recent adventures in Tot Trays.

Tot Tray 1-
Squeeze a medicine dropper full of vinegar onto a tray of baking soda. We used food coloring to dye our vinegar pink for color practice. This provided about a half hours worth of bubbly fun and fine motor practice. Once all of the baking soda/ vinegar reaction happened, I gave Fisher a toothpick to stir with. He played for an additional 15min breaking up the clumps. Truth be told, he shoved as many clumps as he could into his mouth everytime I looked away. Mac n cheese... Too mild for this culinary adventurer. Vinegar soaked baking soda... Delish! 


Tot Tray 2-
Use an ice cream scoop to place large pom-poms into an egg carton. After about 10 min, Fisher became obsessed with trying to hold more than one pom-pom at a time in the scoop. There were tears.


Tot Tray 3- 
Tea bag painting! Tape white cardstock to tray to keep it from sliding around. Place tea bags onto paper. Use a medicine dropper full of water to soak the tea bags and get the "paint" flowing. Use a paint brush to move your paint around. We used different fruit flavors of tea which provided a variety of colors and smells. This activity became more about smell and taste for Fisher than anything else. He enjoyed tasting the tea bags while we talked about the flavors and pointed them out on the tea box.

Monday, November 25, 2013

Flavored Toothpicks Tutorial


Crafts, crafts everywhere and not a girl to craft for. Beautifully handmade things are sadly unappreciated by boys, but here's a craft I found that even my husband drools over. Homemade
flavored toothpicks are yummy and easy to make.

You need:
A small jar
A flavor oil (bought in the candy making section of craft stores or baking section of health food stores. Rootbeer was my favorite, but I'd love to find some bacon flavor oil for a real man-treat)
Box of toothpicks


Directions:
Pour a small amount of your chosen flavor oil into the bottom of your jar. I poured til I had about an 1/8th inch layer
Stand your toothpicks up in the jar. If you’re making a very small batch of toothpicks, you’ll want to use a small jar like a spice jar so that none of your toothpicks are laying flat in the jar.
Cover and let toothpicks soak. The amount of time you leave them depends on your preference of strength. I left them overnight.
Bake at 200f for 5-10 min spread out on an aluminum sheet
Repeat for as many flavors as your heart desires

Monday, April 29, 2013

DIY Woven Embroidery Thread and Chain Bracelet

 
I was so excited about this bracelet I saw on pinterest. The tutorial from Honestly...WTF is very easy to follow and turns out amazing results. Note for next time- Find a better starting bracelet. The starting bracelet in the tutorial is chunky and beautiful on it's own. You will not be able to find a good starting bracelet at the craft store. This is one pin I'll be trying again soon.
Honestly... WTF


Monday, April 15, 2013

DIY Scrapbook Paper Origami Box

 
Unlike my previous origami gift box, this tutorial from Activity Village only uses 2 pieces of paper. I made many of these last Christmas to hold small handmade gifts. I loved using different scrapbook paper from the same paper pack. This way the box and lid coordinated without being too matchy matchy. In general I much prefer handmade bows (like these here) to curling ribbon, but honestly it doesn't feel like Christmas til I've curled some ribbon.