Monday, April 30, 2012

DIY Wrapping Paper Wine Box

Had a friend’s birthday this week and wanted to give her my new favorite sweet wine, Camelot. But of course, everything is better in pretty packaging so I decided to make a wine box. It’s pretty much just a paper mache project. Hobby Lobby sells wonderful cardboard unfinished wine boxes. I found adorable craft wrapping paper at Borders.


Supplies Needed:
Cardboard unfinished wine box
Choice paper (scrapbook paper or wrapping paper)
Mod Podge OR School Glue & Water mixed
Sponge brush
Water
Scissors
Paint (Optional)

Directions:
Remove the lid from your wine box. Remove the handle from the wine box. Measure and cut enough paper to go around your wine box. If using scrapbook paper, you may need to have multiple pieces that you will overlap. Your paper should be a couple of inches taller than your wine box. Attach your paper to you wine box using the Mod Podge leaving an inch hanging higher than the wine box and an inch hanging lower than the wine box. Attach your paper all of the way around the box with Mod Podge under the paper and over the paper. Your paper will probably bunch up and wrinkle. As the paper soaks in more glue mixture, you will be able to make it lie flat by running your fingers over it. Be patient, it will get there and will be worth it. As you flatten your wet paper around the wine box, tuck the hanging over paper into the box to make a good edge. Do the same with the paper hanging over the bottom. Once your box is completely smooth, allow it to dry. Mine only took about 15min. Use a pen to poke holes where the handle goes and reattach your handle. For the lid, there are a couple of choices. You could repeat the above process on your lid to make it match your bottom. You could repeat the above process using a different paper for contrast. You could paint the top (I would use acrylic paint) in a color that compliments or contrasts your chosen paper. In the example shown I left the top exactly as it came because I love the craft paper look with my craft paper wrapping paper. Voila!


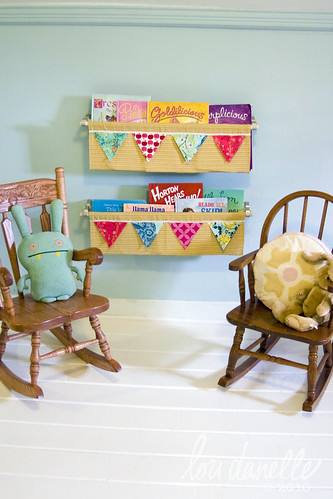
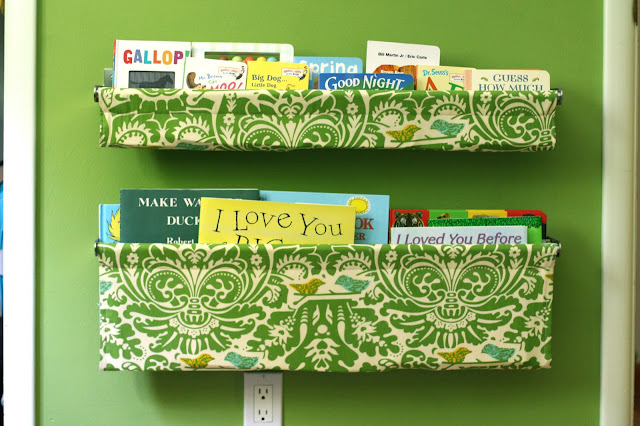
Here's another use for wine boxes, that I'd love to try:

from: All The Luck In The World

Monday, April 16, 2012

Soft Handmade Baby Blocks


One more baby shower to go to = one more chance to play with the sewing machine. I am really loving the pink and teal color combination. Too bad those colors aren't appropriate for my son. I think my husband would kill me. Or at least take away sewing privileges :)  For this project I put the blocks together first, then made a drawstring bag to hold them. Its a good thing I waited to make the bag. I would have ended up with a huge bag and not enough blocks. The blocks weren't especially difficult, but more time consuming than I would have guessed.


Some tutorials:

Soft Fabric Building Blocks - 2
from: cherry menlove

from: Sew Like My Mom
from: Smile and Wave

from: Zaaberry

This link is for purchasing a pattern, not a tutorial. By following one of the tutorials above, it'd be pretty simple to make them like these animals.

Animal Soft Blocks E-pattern
from: Sew Baby

Monday, April 9, 2012

Simple Amigurumi Crochet Owl


When first finding out I was pregnant I decided 2 things about the nursery. It would be grey and yellow, and it would have bird accents. I'm not much for themes but I like to mix and match stuff within my style. I immediatly knew I wanted to keep the nursery gender neutral so we could use the same nursery for our second child (whenever or if-ever God decides to bless us with another one). Fisher will move into the slightly bigger bedroom, now an office, when he gets older. By then he'll be sure to have more of an opinion about the theme and colors of his room. The first thing I made for my unborn child was this little owl. I loosly followed a free pattern, listed below, but continued using increase stitches until it was the size I wanted. The tiny owl in the pattern was adorable, but a little too small for a baby to safely play with. My experiece with crochet is very limited, (I've only made 2 other amigurumi, and one hat) so this should be a good project for any beginner.


Here's the free pattern I used for my owl:
Day 3: Amigurumi owl.
from: littlegreen

Other free patterns:

from: sukigirl

Free Amigurumi Owl Pattern
from: Curls of Sunshine


from Roxycraft


More adorable owls:

from: PosiTori

from: Cute Designs

from: The Unique Boutique For Me

from: GiggleStuff

Monday, April 2, 2012

Handmade Book Sling


 Book Slings! From the first day I found out I was pregnant, I knew I wanted to make this for the grey and yellow nursery. It's a fabric pocket just the right size for picture books. I love that its placed at child height, and Fisher will be able to pick which book he wants from seeing the picture on the front. In a book case kids only get to see the side binding and will pull every book off the shelf in search on the one they want. I'd love to have a bin below of the books we keep, and refresh the books in the sling every week from our library trip. The sling is made from fabric and a double curtain rod. The full tutorial I followed said I could find cheap hardward at Lowes, but I didn't see it. I ended up spending $10 at Big Lots to buy a double curtain rod set that had everything included, which was cheaper than the estimated $16 from the tutorial anyway.
I love having a different fabric inside the sling. You really only see it when you look inside for a book, but the yellow is such a happy surprise.


The full original tutorial is available here:

Fjs FINAL6
from Penny Carnival

Other awesome book slings:

from: craft g33k


from: Our First Slow Dance

CRW_0621
from: Lori Danelle


from: home in the country
 
 
from: Team Raley